Friday, June 7, 2013

Dessert Friday! Peanut Butter Lava Cookies

Pinspiration: http://pinterest.com/pin/185210603398368933/

I get excited when I get invited somewhere that requires me to bring something to share. So when I got an invite to a small party at my niece's new condo, I decided to try out these peanut butter lava cookies, since I had some pie crust I needed to use up. And I love peanut butter. I did have to buy creamy, because I usually only purchase crunchy peanut butter. JIF Natural Creamy was out of stock, so I went with the store brand (which is the oil on top, you gotta stir it, kind).

I didn't take a picture of the "roll out the dough" step. Or the "spread the peanut butter" step because I forgot.


I was surprised to discover that I didn't have a round cookie cutter, but I found a shot glass that worked pretty well.


I really tried to keep them as close together as possible, so I could get as many cookies as possible.


I didn't do the thing with the forks. I tried, but it "popped" the seal on the cookies and I didn't want the peanut butter to melt all over the cookie sheet (and therefore, no longer be inside the cookies). I also couldn't get a good set of fork marks (maybe my dough wasn't thawed enough).


I did bake all of the little middle pieces. You can also see one of the cookies where the "seal" had been broken.


I was so excited to try these!

Peanut Butter Lava Cookies

1 box of refrigerated pie crust (if you freeze yours like I do, make sure it is thawed completely)
Approx. 2 c of creamy peanut butter (I used Meijer Naturals creamy)
1/2 c sugar

1. Preheat oven to 350.
2. Unroll the pie crust and spread an even layer of peanut butter on one, coming as close to the edge as possible.
3. Cover with the other pie crust.
4. Use a round cookie cutter to make round cookies approximately 3" in diameter.
5. Toss cookies in sugar and place on cookie sheet. My cookie sheets are non-stick, so I didn't put anything between them and the cookie sheets.
6. Bake for about 12 minutes or until golden and firm.
7. Once they have cooled, toss them in the sugar again.

------------------------------------------------------------------------------------------------------------

Review:

While mine didn't "lava" (and I even used the same kind of peanut butter the original post did), they were still delicious. And soooooooooo easy. So I will definitely be making these again.

Thursday, June 6, 2013

Slow Cooker Thursday: No-Peel Apple and Steel-Cut Oats

I love putting things in the slow cooker at night and waking up to a yummy breakfast. Waking up and just smelling yumminess in the air.


Everything in the slow cooker! I did spray the sides and bottom with Pam. I added a tablespoon of cinnamon because... what's apple oatmeal without cinnamon??


This is 7 hours later. Pre-mixed. I really thought I took a picture after I mixed it and before I served it. As you can see.... MAJOR sticking on the side. I had chunks of burnt oats that I threw out. 6 hours probably would have sufficed. I did half it, so I probably should have adjusted for that. Next time, I may just put it on "warm" and see how long it takes.


Ready to eat!

Slow Cooker No-Peel Apples and Steel-Cut Oats (modified)

1 apple, un-peeled, cored, cut into 1/2-inch pieces
1.5 c milk (I used almond milk)
1.5 c water
1 c uncooked steel-cut oats
1/8 c brown sugar
2 T butter, cut into 2-3 pieces
1 T cinnamon
1/2 t vanilla
1/4 t salt

1. Spray inside of a large slow cooker with cooking spray.
2. Add all ingredients and stir.
3. Cover and cook on LOW for 7 hours (maybe less depending on your slow cooker).
4. Serve oatmeal in bowls. You can also add raisins, any other fresh fruit or dried fruit, walnuts or other nuts or maple syrup.
5. Store leftovers in refrigerator. Freeze in individual servings if desired.
6. To reheat single servings: Put 1-cup cooked oatmeal in microwave-proof bowl. Add 1/3 cup fat-free milk. Microwave on high for 1 minute; stir. Continue cooking for another minute, or until hot.

------------------------------------------------------------------------------------------------------------

Review:

I'm still not sold on steel-cut oats, but will keep using them until they're gone. Adding milk (I used regular milk to reheat because I had run out of almond) to reheat helped some. Maybe more cinnamon or vanilla would help, because I think steel-cut oats have a very strong flavor.

However, this was much better than the chocolate oatmeal.

Wednesday, June 5, 2013

Craft Wednesday: What to do with all of those concert tickets??

Pinspiration: http://pinterest.com/pin/185210603396329716/

I loooooooove this idea. But those shadow boxes are generally kind of expensive (relatively... if you're someone who likes to create things).

I go to concerts a lot. And sporting events. Etc. And I save tickets. All of them.

So I wandered around Michael's one day, with this idea in mind, and tried to figure out what exactly I wanted. Then I found a box with glass on all sides (except the bottom). A lid. And a latch. That'll work!


There were several of them on clearance, so I found the one with the best looking glass.


But I didn't realize until I got home that the latch was broken. Oh well. That wasn't the main feature (and I'm sure I can find one to replace it). 


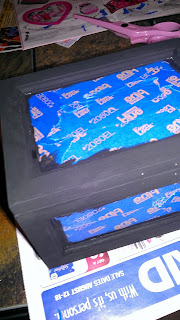
So I sanded it really well, all wooden parts. And removed the metal parts from the latch.


And painted it black.


I gave it 2 coats, to make sure it was nice and black.


And used spray shellac on it.


And painted words all over it in light blue (it was what I was feeling at the time).


And filled it with tickets. 


Some of the tickets don't fit very well, so I may switch to the original shadowbox idea, if I find a really good deal on one. I still haven't found a lock/latch to use, but I'm still keeping an eye out.

Tuesday, June 4, 2013

Organizing All the Manuals

Ah, yes... manuals. Am I the only one who finds it necessary to save EVERY single manual? I have a manual for almost every thing I own that came with one. I don't throw them away. Especially for items that I will possibly resell in the future. I used to keep them filed in my filing cabinet, except for the kitchen ones, which I kept in a drawer in the kitchen.

But then I saw this pinspiration: http://pinterest.com/pin/185210603397260625/

And I also thought... why am I not keeping the receipt with the manual?

This was also part of getting my filing cabinet reorganized, which you will see soon (sometimes I open it just to look at how pretty it is).

I started with one binder... and realized that it was impossible to fit them all in one. So I organized them by room and keep the binders in each room.


I bought the 3 on the right at Tuesday Morning. I think they were $2 each. The other 2 are ones I bought a while ago for other organization that became unused after I reorganized the filing cabinet. The binders in the original post are probably better, because the rings are bigger, but I wanted all of my binders to be the same size and I already had some that size, so I got more to match.


I had these stickers leftover from some organizing at work last year, so I used them to label the binders.
k : kitchen
b : bedroom & bathroom
c : computer
o : office
lr : living room

I am literal too. I store my vacuum and steam mop in my office, so those manuals are in the o binder (even though the steam mop is obviously never used in the office). When I got a new TV and moved the old one to my bedroom, the manual was moved from the lr binder to the b binder.

When I was cleaning out my receipts, I made sure I paid attention to any appliance or electronic, so I could add those to the binders.


And that's my cat. She was actually chasing her tail. Not curled up, sleeping peacefully. This is what she was doing while I was organizing manuals. Which is preferable to her laying on the manuals, running through the manuals, sliding around on the manuals, chewing on the manuals...

Monday, June 3, 2013

The "Best" Chicken Enchiladas? Hmmm...

Here's a secret. I really like Mexican food. I especially like chicken enchiladas. Which pretty much are heavy on two of my favorite foods - chicken and cheese. I am willing to try basically any chicken enchilada recipe I find on Pinterest.

When I came across the "best" chicken enchiladas, of course I had to try.

Pinspiration: http://pinterest.com/pin/185210603398426020/

I am still getting a hang of this whole "taking pictures of every step of the process" thing, so bare with me.


Oh, look, there they are, all melty and almost ready to eat. As usual, I halved the recipe.


I also made a really crappy version of guacamole at the same time (the avocado was still too crunchy... tip, buy them at least a week before you need them). Yeah, that's guacamole. I was also really heavy on the cilantro that batch.

The "Best" Chicken Enchiladas (modified)

5-6 tortillas
1 c cooked, shredded chicken
1 c shredded Monterey Jack cheese
1.5 T butter
1 T corn starch
1 c chicken broth
1/2 clove of minced garlic
1/4 t of salt and pepper
1/2 c sour cream
1/2 t onion powder
1/2 t garlic powder
1/2 t cumin
1/2 t of lime juice
1/2 finely chopped jalapeno, seeded

1. Preheat oven to 350 degrees. Grease a 9×9 pan (8x8 will do).
2. In a medium size bowl mix chicken, 1/2 c of cheese, garlic and roll mixture into tortillas and place into pan.
3. In a sauce pan, melt butter and stir in corn starch and cook for one minute.
4. Add broth and whisk until smooth. Keep over heat until it bubbles and becomes thick.
5. Stir in sour cream, chopped jalapeno, cumin, onion powder, garlic powder, lime, salt and pepper. Do not let it boil.
6. Pour mixture over enchiladas and top with the rest of the cheese.
7. Bake for 25 min or until the cheese has browned.

------------------------------------------------------------------------------------------------------------

Well, you'll notice I've been using the word "best" in quotes. While these were good, they were not my favorite chicken enchiladas. I would probably make them again, because they were fairly easy. But I don't think these deserve the title of "best".

Sunday, June 2, 2013

Cleaning Wax Off a Bathroom Counter

I have a cat. One day, I accidentally left her unattended while candles burned in the bathroom. That day, I had cleaned the bathroom and wanted to burn some candles to give it a better feel. I wasn't too worried about the cat, because she spends about 98% of her time in the same room as me. And while she does like to poke her nose near candles, she's never gotten more than a few singed whiskers from getting too close. While they burned, I sat down to watch something on TV and lost track of the cat. Several minutes later, I heard a small crash and the cat suddenly jump on the floor and run.

When I walked in the bathroom, there was a large puddle of wax on the counter and splashes of it everywhere. My first concern was that the cat was ok (since she had stuck her paw into a flame). I managed to clean up what I could off her paw and she eventually managed to get the rest. By then, the wax on the counter had hardened, so I didn't know how to clean it up. After a few minutes, I thought, "Hair dryer!" My hair dryer could easily melt the wax and I could easily wipe it up with a paper towel!

I didn't think to take a picture of it until I had gotten the big puddle cleaned up.


In addition to the splashes on the counter, they were on the walls and on some of the things I had on the counter. And then a couple weeks later, I found a spot of it on a mixing bowl that was a shelf next to the bathroom (which is in the kitchen).


She's kind of afraid of the hair dryer. But not open flames!


Clean counter!

I did kind of have some Pinspiration for this, by merging a couple ideas. They were probably stuck in my subconscious, because I didn't go to Pinterest to do a look for ideas.

http://pinterest.com/pin/185210603396401073/ - This is out of carpet and suggests an iron. I wouldn't recommend using an iron on a counter.
http://pinterest.com/pin/185210603395619450/ - If a hair dryer can be used to remove stickers off cups...

Saturday, June 1, 2013

Banana Oat Pancakes!

I don't know about you, but Saturdays are usually the days I actually take the time to make breakfast. Who has time during the week? (I mean... when you're actually employed) Friday night, I usually end up falling asleep early on the couch, eventually heading to bed, where I end up waking up somewhat early due to my early bedtime. So I have time to lazy around and take my time making breakfast.

So... I tried the Banana Oat Pancake recipe. Pinspiration: http://pinterest.com/pin/185210603397965460/

I did actually make my own oat flour, which just required putting the recipe amount into a food processor and grinding it up. (So 1 c of oats = 1 c of oat flour)


Mine certainly did not look as pretty as the original. And as you can see, I didn't mash the banana all the way. I left a lot of chunks.


But ugly doesn't mean they won't taste good.


And they tasted amazing. (I halved the original recipe)

Gluten-Free Banana Oat Pancakes (modified)


1 large banana, mashed

1 T butter, melted (or coconut oil)
1/2 T lemon juice (I used the bottled stuff)
1/2 t honey (or maple syrup)
1 egg
1/2 c oat flour (1/2 c oats - I used old fashioned - in a food processor until fine)
1/4 teaspoon baking soda
1/4 teaspoon salt
1/4 teaspoon ground cinnamon
1/8 teaspoon ground nutmeg

1. In a small bowl, stir together mashed bananas, butter, lemon juice and honey.
2. Beat in egg.
3. In a medium bowl, whisk together oat flour, baking soda, salt and spices.
4. Form a well in the center of the dry ingredients and pour in the wet ingredients. With a big spoon, stir just until the dry ingredients are thoroughly moistened. Do not over mix or you’ll run the risk of getting tough pancakes!
5. Let the batter sit for 10 minutes.
6. Heat a nonstick skillet over medium-low heat.
7. Once the surface of the pan is hot enough that a drop of water sizzles on it, pour 1/4 c of batter onto the pan. Let the pancake cook for about 3 to 4 minutes, until bubbles begin to form around the edges of the cake.
8. When the pancake is just beginning to set, flip it with a spatula and cook for another 90 seconds or so, until golden brown on both sides.
9. Serve the pancakes immediately or keep warm in a 200 degree Fahrenheit oven. I sprinkled them with powdered sugar.

------------------------------------------------------------------------------------------------------------

Review:

Delicious and easy!